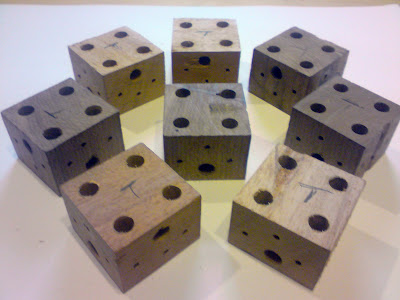
Hard wood blocks bought from my local Hobby craft shop 7.99 per pack of assorted hardwood blocks take a ruler measure blocks in the pack before purchase.
Tools used:-
Pedestal drill, Compound mitre saw, 8 mm wood bit drill, 8.5 mm standard drill, 2.5mm standard drill, G clamp, bolt down pedestal drill vice, Electronic digital calliper (Maplin), small off cut of 2x2 Softwood, 3mm screw tap.
Method used:-
Note:- I Checked and double checked safety and dimensions several times before cutting.
I Clamped the 2x2 softwood to the mitre saw fence set it to cut 44mm.
Then cut the hobby craft blocks down length wise.
I rotated the length of 44 mm wide through 90 degrees and cut length wise again.
I Clamped the 2x2 softwood to the mitre saw fence set it to cut 33mm.
Now turn the 44mm x 44mm so you can cut 8 33 mm blocks I got 5 from each length.
I Checked and double checked safety and dimensions several times before cutting.
I cut MDF scrap first to check the cut position was correct.
I then checked the dimensions of all the blocks and the squareness. I marked up the two holes on the 33mm side positioned the pedestal drill vice bolted it in position marked the vice with pencil lines to line up the blocks then and drilled the first block rotated it through 90 degrees and flipped the block over and drilled through. I repeated this for all the blocks like this using the 8 mm drill. I then changed the drill for the 8.5 mm drill and repeated the operation for all 8/10 blocks. I marked up the top of one of the blocks with the 4 holes re set up the vice to drill one of these holes put the 8mm drill back in positioned block in vice marked the lock position in pencil on the vice drilled one hole rotated the block 90 degrees drilled the next hole in the block repeated this twice more. This was repeated for all 8/10 blocks. changed the drill to 8.5 and re drilled all the blocks again. I repeated the same process for the 2 mm holes on the drawing I changed the size of hole to 2.5 mm to tap 3mm threads in to the wood.
Time taken:-
One evening about 4 hours.
Drawing:-
Dimensions for manufacturing these blocks this was a saved PDF file found some place on the Rep Rap Main page needless to say even after down loading the whole of the REP RAP site and searching through the files I still cant find this PDF file to provide a link so here is the relevant excerpt. The document could have been called handmade-parts.pdf it is by Joost van de Wiel
  | |